Category: Action Plan

Reflections on Levels of Instruction and Structured Failure

Today was a really fun day, I was able to try out my first round of woodworking in the maker space during Wellness Wednesday. The goal was to have students build a small box out of popsicle sticks and balsa wood. Within that task, they would learn to use proper measuring techniques, how to use Exacto knives properly as well as how to use wood glue and even small clamps if necessary.

While designing this activity I was constantly mulling over the level of detail and instruction I should give. Generally, when doing most hands-on STEM things, I try to present as bare a scaffold as possible so that students can take a general idea and run with it as far or as deeply as they would like.

When I thought about this more deeply I realized that the more instruction I provide, the less room there is for students to be creative and there would be more opportunity for students to focus on making mistakes instead of the final product. I don’t want students focusing on my approval at each step, I want them focusing on the task at hand and actively trying something.

My How Might We question this year is “How might we design meaningful situations where students can safely learn to fail?” In a culture that so intensely presents a need for success and excellence, how can students learn to fail or move forward after making mistakes? Failure is a learned skill and vital not just for academic success, but also for mental health and life in general.

In a maker space, mistakes and failure are a vital part of the building and design process. Many of my students coming into my room have never really built anything with their hands. All of this is new for them and I am so excited to see them try things, break them and build them back again.

What I’m left with now however is the same thoughts I had as I planned out this activity. How much instruction is the right amount to promote a healthy level of mistakes? @sreimer asked me some great questions about how to avoid the “is this correct?” question from her students and I am wondering that as well. I think my direction now will be turning towards the amount and detail in my instructions and how that can possibly lead towards a bit more creativity and room for safe mistakes in the classroom, maybe even failing at tasks without panic. However my mind still feels like the graphic @lmcbeth posted and I wouldn’t be surprised if these thoughts led me in a whole other direction. I’m also interested in hearing about what other Cohort 21 members think. How do you balance the level of detail in your instruction? Does any of this ever cross your mind?

Sharing Some Successes from the Start of the Year and Committing to a Goal

I hope everyone has been having a good start to the year, it’s been a complete whirlwind for me but I wanted to take some time to reflect on some great successes I’ve had so far this year as well as commit to my goals for the future.

This year I was so happy to take on a new leadership role as the Middle School Tech Lead. With it came some new responsibilities such as planning out Wellness Wednesday activities for our Middle School maker space.

This year I wanted to try something new and put myself out there. One of my goals in the past was to learn more about 3D printing and how I can incorporate it more into our curriculum. Not only that but how can I present it to my colleagues without overwhelming them? To that end I decided to start small by using the software Tinkercad and having the students and teachers learn how to make their own name tags or key chains. Here’s an example of the first one I made!

I can’t begin to express how much fun I and the students are now having on Wednesday afternoons when they began to learn the software and create their own designs. The software is so user friendly and fun. I’m debating on making a post on how to use it if anyone is interested please let me know and I will make one! It ended up being a really approachable activity that (fingers crossed) the students enjoyed and will hopefully incorporate more into their own PBL projects in all other subjects.

There is another reason I was so thrilled with how this activity went, and it has to do with my personal goal this year that I want to focus on.

I want to create more opportunities for students to really try things, mess up and learn from their mistakes. My first year at Cohort 21 my goal was to learn more about how to make Middle School students more comfortable with trying things and making mistakes in math. But as I continued my research I realized that I wanted to go deeper. I firmly believe that we need to make more opportunities for students to really fail at something and learn how to deal with that failure. Failing at things is a learned skill, nots something kids know how to do inherently. A maker space is a perfect place for that to start. It’s a space where you build things, break them and build them again. The stakes are low but the learning opportunities are high.

This year I would like to develop more curriculum that centres around failing and moving forward with that failure. With the concept of learning how to fail and how to get back up again. I often wonder about how much we tend to protect our students in an independent school setting from failing and how that might correlate with anxiety and strong levels of perfectionism that I see among our students as they get older. I believe this goal is not only pedagogical but cultural and I will no doubt hit some bumps along the way, but I want to firmly point myself in this direction and try to take a step forward this year.

So, #sharpsweetandsalty here is my post and my first step. I am so excited to see what everyone else puts forward and to encourage you every step of the way!

Sketches, Collaborating and Physics in Todays Classroom

I left our latest face to face on Saturday feeling really energized and excited, especially to the concept of renewing my commitment to sharing what I am doing and how that has been helping me within my classroom.

To that end I decided to share a resource I have been sharing with my teammates at SMLS for the past few weeks. It’s made a big difference for me and I hope it is something that can help you! It’s a software called Nearpod.

Basically, Nearpod is a way to put a variety of activities into your pre-existing presentations, and instead of having to share your screen while in a meet or project slides, the presentation is visible to the students on their own devices and it becomes much more interactive. One of the reasons I love it, is that it allows me to change the pace and feel of my lessons. Built check-ins in the form of open ended questions, polls or collaboration boards gives me a really good feel of where my students are and what they are thinking. It lets me know in greater detail how much they understand and if I need to back track or can pick up the pace of a concept.  Above, you can see an initial selection of different activities to put in to your slides. There are just so many from taking a poll to using VR to visit Machu Picchu. For me, during remote learning, I was losing a lot of opportunities to have my students collaborate or present more of their tangible thinking. This was especially true when I was beginning to teach forces and force diagrams during my structures unit. This is where this software shines.

What you are looking at, is the option for students to draw a diagram using Nearpod. In this instance I showed them a video of two people rock climbing together. I then asked my students to consider the forces acting the climbers at any point in time as well as the pushing or pulling that they were doing while climbing.

Normally the girls would have chart paper or big white boards and we would be doing more hands on things when introducing physics, but with Nearpod I was still able to have them put down their ideas and get messy, even if only digitally! My students had a lot of fun and it was something I loved having up my sleeve.

If you are interested in trying this out the biggest thing I want to let you know is, this is not a complex software, you do not have to re-invent the wheel. That’s one thing I find often happens with tech PD is that sometimes there is such a big learning curve it seems impossible or demoralizing. Thankfully this is not the case.

Here’s two ways you can try it, the first is to make your own nearpod account and upload any powerpoint presentations or google slides you may have and from there choose some of the great options of activities to use. This is an option with the free account and something I have used a lot.

Or if you try out their paid service you can download the add-on on google slides and edit directly. This is the way I’ll show in more detail.

From there you can edit and add a lot of really fun options in to your slides.

One of my personal favourites is the PhET simulations that allow your students to dive right in and mess around a variety of STEM topics.


Or if you want to add a small assessment at the end of your lesson you are also given the option to put in small multiple choice quizzes in to your lesson. This includes a build in grade book that assesses the responses for you and allows you to break down your data.


And finally if this is all still overwhelming. Please feel free to just look through a ton of pre-made lessons. There are so many that I use and have a lot of fun with in my class.

I hope you try this out and mess around with this software and I hope it lets you get a little more hands-on and messy in your class than you could before.

Please let me know what you think and I hope you have a fantastic long weekend!

stay healthy helpful and calm


Spooky Video Game Design!

Welcome back to Messy STEM! This week I will be continuing my coding theme and focusing on designing video games. The software I use for this is called Gamemaker Studio 2. Let me start by saying this is an authentic software. It has been used to create a wide variety of popular video games including Undertale, Hyperlight Drifter, and Forager. This software allows games made with it to be published on every platform including Steam, Nintendo and Playstation. That alone I have found is enough to get kids excited. I have yet to have a student not tell me what they’re going to do with their millions of dollars once they upload their games and start selling them.

Whenever I teach this software I am always amazed and motivated by the different and creative things students come up with. They can really dive in to the software and mess around with different coding concepts.

I also want to state that there are a ton of resources for this software made specifically for educators and a lot of great youtube tutorials out there. So, if you finish reading this and want to learn please let me know and I will be happy to share resources I’ve liked, as I learned the software!

Over the course of this post I will be showing a quick run through of how the software looks and some basic things you can try out yourself. I know that I will be glossing over some steps but my main goal here is to show how the software looks/feels and to present you with a resource you might not have known of before this.

The photo below shows what Gamemaker Studio 2 looks like it when you open it up and sign in. For those of you wondering, the software is the same in Windows and Mac, so though I am showing this through Mac you can still learn and try it through Windows

Once you open up Gamemaker, it gives you the option to create a new project with either drag

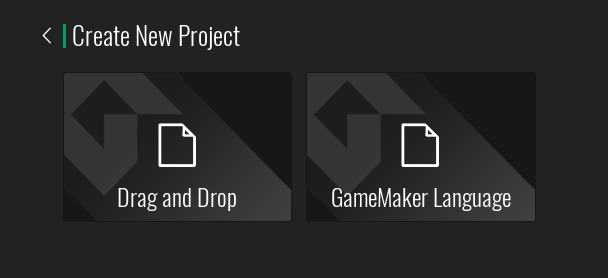
and drop code options (similar to those on Scratch for example) or GameMaker Language which involves writing the code. I have always preferred the code! It’s what I will be writing about today.


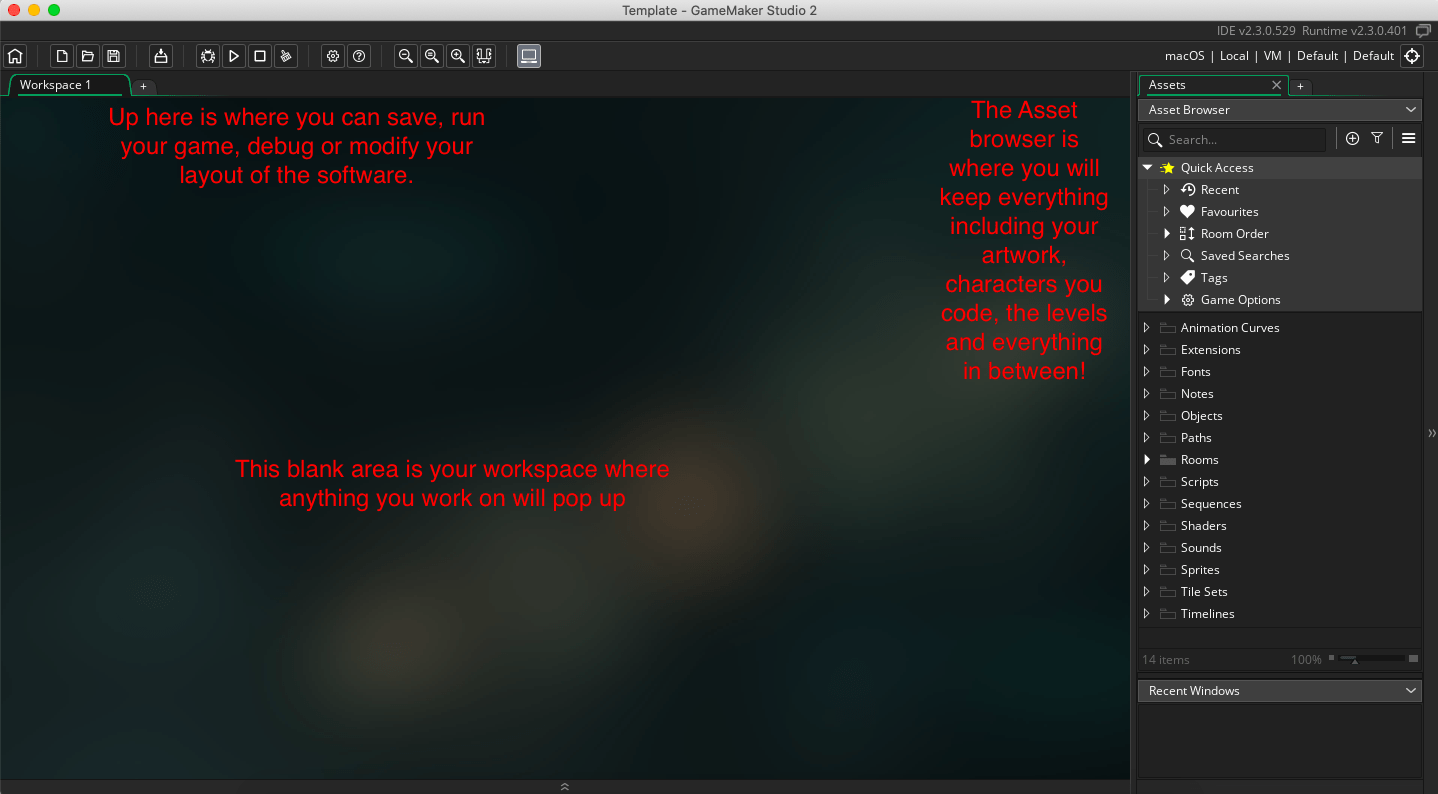
Once you start a new project, don’t be overwhelmed by what you see! This is a professional software but it is very straightforward! Below is a summary of what you will see.

In the spirit of Halloween I thought I would do some spooky examples!

The main things you will work with initially are Objects, Rooms and Sprites. These are all things you will find in the left sidebar above.

Sprites are where you store your artwork for your game. This can include animations and gifs. It’s important to remember that a Sprite is not something you program, it is what you attach to what you have programmed. Below is a photo where I have selected my sprite, a dancing skeleton. In it I have painted a bit over my skeleton’s feet. It also shows the series of images that will be played on repeat to animate my character. In Gamemaker Studio 2 you can design and draw characters within the software or import images from your computer. In this case I used free graphics to upload a dancing skeleton gif. To make a new sprite simply click the Sprite category and select add new sprite.

Rooms are essentially your levels, they are your backgrounds. Anytime your character goes to a new place or a new level, they go to a new room.


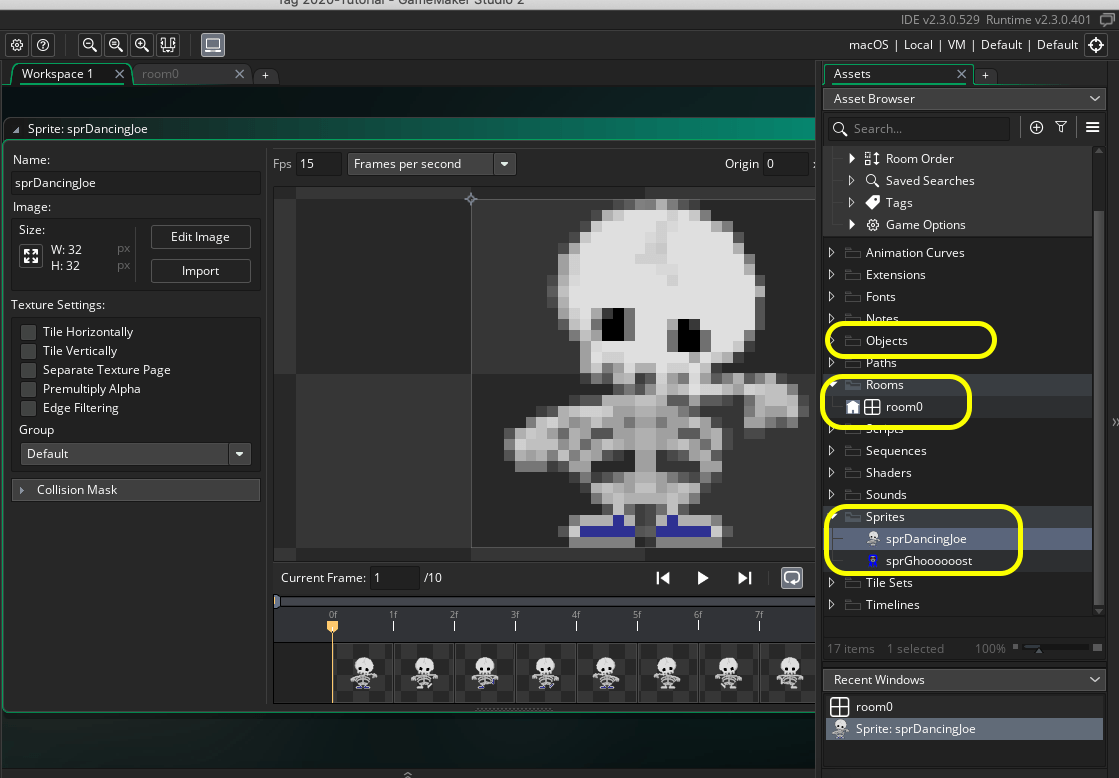
Objects are the parts of your game that you actually program.

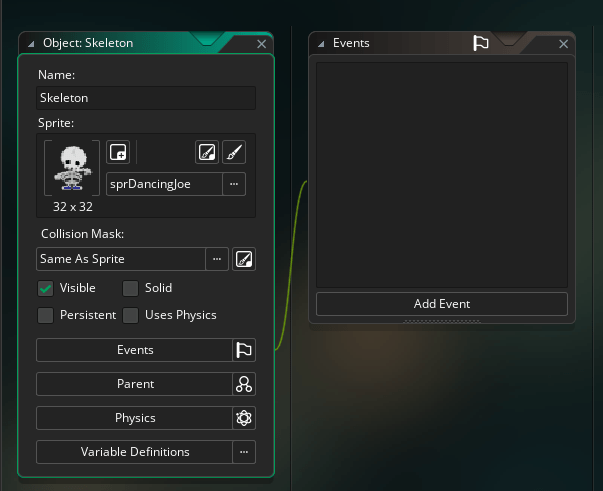
These would be your characters, bad guys, walls, etc.                                                        Basically, anything you want to respond in any way, you will make in to an object. In this case I have made an object named Skeleton. Once you make the Object (just double click Objects in the asset bar shown above, click and select make new object) you then can attach the artwork you saved in the sprite section, which was my dancing skeleton gif.

Once you make an object you will then be given the option to select it and begin programming! Above you can see my Skeleton and that I have attached the sprite/artwork to it. The next thing that pops up are Events. Events are essentially where you program coding and reactions of your object. 

As I mentioned in my previous post, computers are not mind readers, when programming you need to consider every aspect of what you want to happen. In this situation I want my character to move to the right when I press the right arrow key. So to do that I clicked Add Event, and Key 
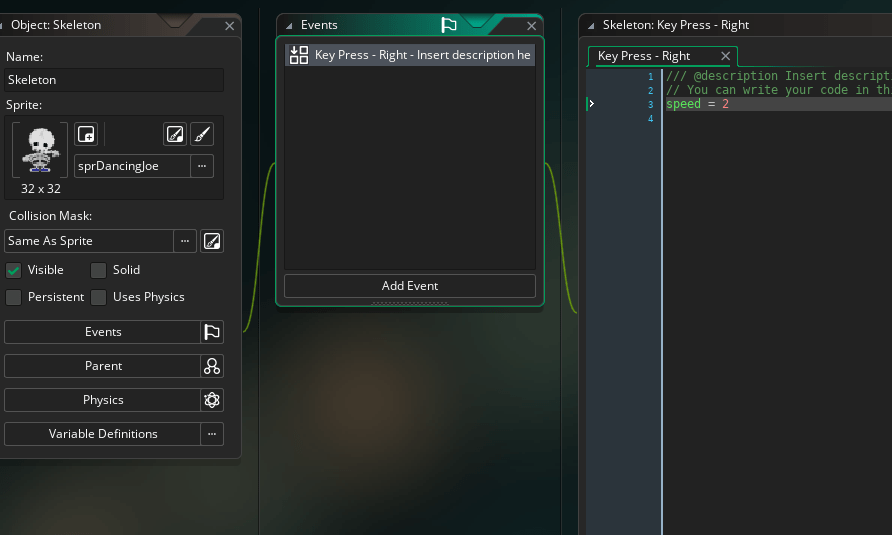
Press, then Right. After that you will see on the right the place where you can type in your actual code. To keep things simple I wrote in ‘speed = 2;’

What I have basically said is, when I press the right key I want my skeleton to move to the right at a speed of 2. If I wanted him to move to the left I would do select left arrow key and have the same code but my speed would be -2.

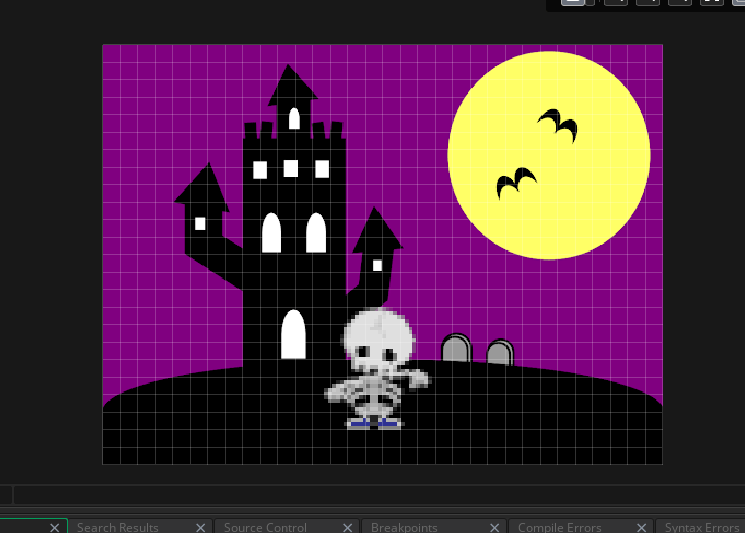
The next thing I did was work on my room, I decided to create a spooky sprite and select that as the background in my ‘Room’. After making my room, the next thing you can do is drag your objects in to your room. You can then press the play button on the top bar to run the software and see what the game looks like!


Here is a sample of what our spooky skeleton looks like.

This was just a basic run through of some simple concepts. Often I start this software by teaching students to make a game of tag where characters throw food at each other. In it we can do different things like set up a score and special affects. Here is another silly sample! 

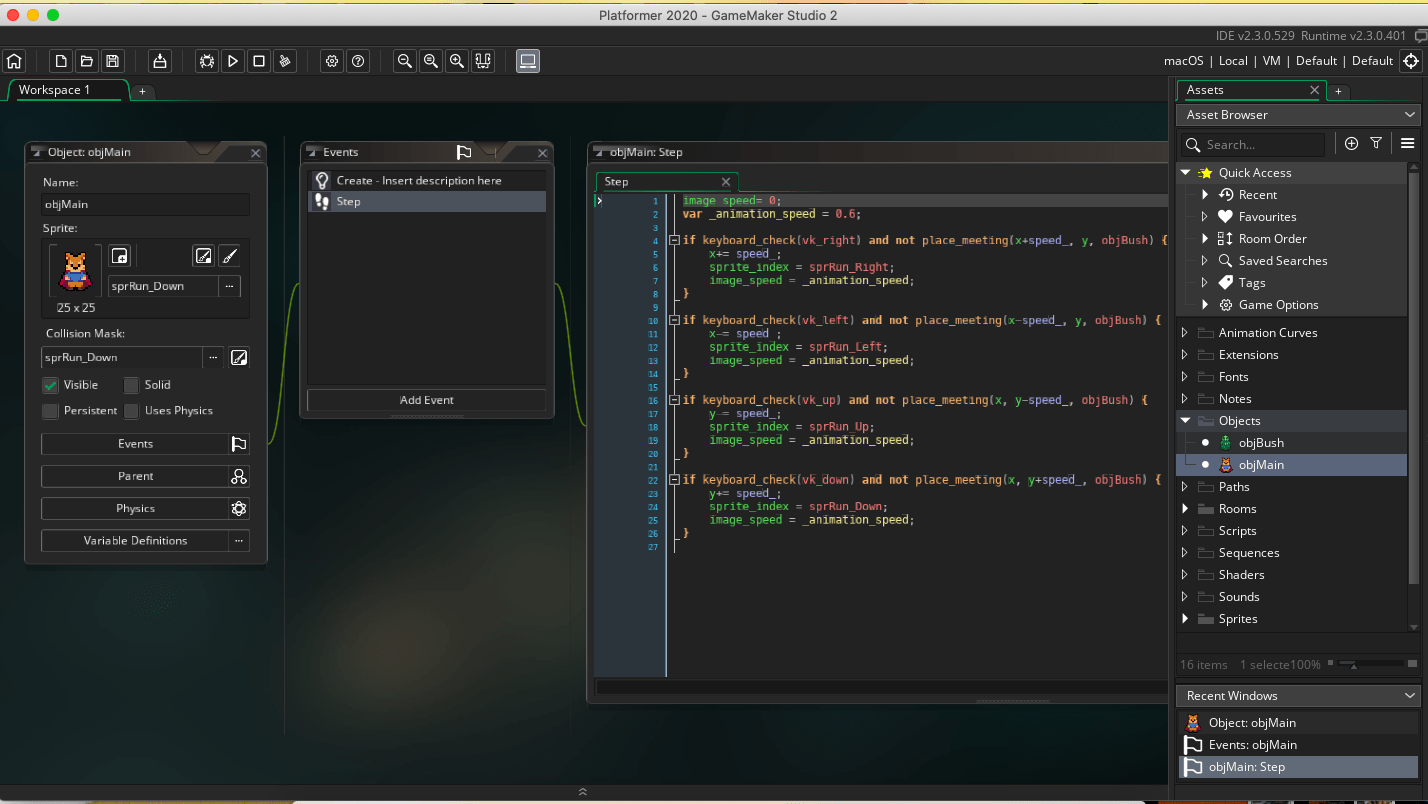
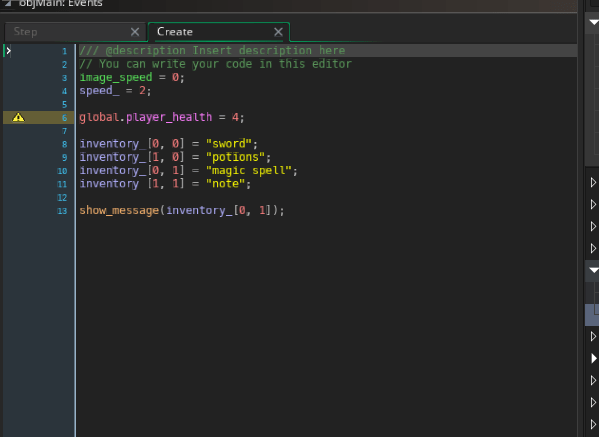
That being said you can easily go much deeper into this software. You can challenge your students to define and set their own variables and even define constants. Below is an example of a more complicated platformer game I have been messing around with based on some online tutorials. I also have a photo of an array I started that will allow my character to have an inventory!

I understand that this was a big post with a lot of information, but if I have interested you at all in this software and you want to try it out in your school please feel free to reach out to me and I will be happy to share resources and ideas. I also highly recommend the educator resources that this software offers.

I really hope you are all having a great week and that you have a great Halloween. My goal this year is to help you all get back into a hands-on STEM class where you can get messy, build things and break them. I believe this software is a great tool for that and I hope that it helps you as well!
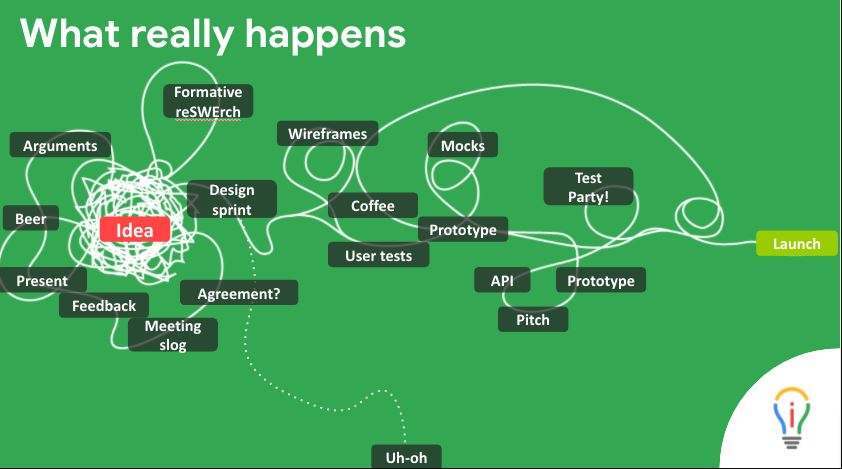
Bitmoji Image

Finding a Direction-Making lessons that fill my bucket during a pandemic

After leaving our first Face to Face meeting last weekend, I took some time to sit down and really reflect on all the ‘How Might We’s’ that I got to consider during our discussions, and I wanted to think about what was really important to me when teaching in this new world. What was really important to me when considering pandemic pedagogy for grades 7-12?

After going through a few bouts of imposter syndrome, and considering what would fill my bucket in a time when it feels like everything is exhausting, I reached a conclusion.

What really fills my bucket every day, is the mess that I can make in my class. I can throw messy, difficult and hands-on problems to my students that they need to solve using Science and Math. We get to break things, and build them again, we get to seek out problems and try to solve them. That’s what fills my bucket, and I’m not sure about you, but with current safety protocols and changes to how we teach, I don’t feel like I’m able to do that as much this year.

To that end I have decided on a direction. My goal this year is to gather resources that will allow me to still make my messy classroom whether it be virtual, hyflex or in class but distanced. I am going to find these resources, review them and share them out with all of you. I want to take some of the pressure off other teachers who feel like the day itself was too much and they can’t think of what to do next. My goal is to show you things that you can use that will helpfully fill your bucket in class.

I’m going to start with a program I tweeted about earlier this week- Polypad by Mathgion

One of the first things I noticed this year was that I could not use any of the math manipulatives I love to show certain concepts in math. To that end I found Polypad, it’s an online platform that allows students to mess around with all the different tools I normally have in class.

The general layout looks like this. You will have a list of manipulatives to choose from on the left and a general blank work space that you can place your tools in and manipulate them. You can see me messing around with fraction bars here.

From there you can also try out different things like tangrams, or even visual representations of algebraic concepts. Overall I found the program very easy to use and I firmly believe students from grade 7-12 will find this easy as well.

They can use this to show patterns, to compare fractions, or even represent the multiplication or differences between x and x^2 and other algebra concepts. They even have cool things like Penrose tiles which I am not entirely familiar with yet but may be interesting to others!

This was useful to me for number talks where I could ask students to consider things like finding fractions between 1/2 and 1/3 or explaining why dividing fractions results in a bigger number.

My hope is that his will be helpful to anyone else struggling to let kids mess around with different things in math and that they will still be able to have some trickier, messy math discussions and show their thinking!

Please let me know if this was helpful for you in the comments and if you looked through this and it resonated. Please also comment if you were thinking of anything in your STEM class you might want to know more about and I will be happy to post about it!

I hope you all have a lovely long weekend and I hope you can take some time to fill your bucket!

Bitmoji Image

Math Dances and Solving Puzzles

This was an absolute week of small and big victories in my math class. To start we are going through an Integers unit and as always certain parts of the concepts completely flummox some of my students . To that end I have a silly dance to help my students remember integer rules. After we had explored and discussed the concepts I showed my students the dance. In the past this has always been something funny but since this is now the age of TikTok my students pounced on it and asked if I would make one for the math dance. I told them I don’t have an account but they were welcome to. Instead I made a silly dance video and posted it to my twitter account @MsGScience2.  If you want to see it it’s on my twitter feed and I have to preface by saying I am not a good dancer.

From there, the energy in math class continued. This week we had a guest from the CEMC come in to visit and because of that my 7’s had to move to a different classroom. From some sheer act of luck we were moved to the exact classroom I was able to watch a grade 12 math lesson in that I had reflected on previously. It is chocked full of whiteboards and ‘good math energy’. I walked in to the class and looked around and thought, ‘I can’t waste this opportunity to shake things up’. To that in when my students walked in I informed them we were going to do a surprise thinking task.

I have been keeping my students informed of the professional development I have been working on and told them that this was going to be a fun trial run on what we have been working on as a class. To that end I put up our math response rubric and we looked over it one more time as a class. We discussed if we felt anything should be changed or if our idea of excellence had changed at all. The girls all felt pretty comfortable with the concepts and how they would be assessed. I then paired them up and spread them out throughout the space and presented them with our open ended question.

The girls then dove into the question and used the space to the best of it’s ability

While they were doing this I was able to circulate, discuss and take notes on their observations. I noticed that the girls were thoroughly enjoying themselves and even go to witness a few of these moments.

Math Dance

Afterwards, I sent out an anonymous survey to the students. I hadn’t planned on doing the thinking task with the students yet, but one of the next steps was to send out a survey to see what I could change or do differently next time. The survey would help me see if my students were seeing the results I was and if I was really on the right track for my How Might We question. I told the students that this was an anonymous exit ticket and that any feedback would be useful to me. Since I am focusing on increasing risk-taking and student buy in in my class, my questions had to do with things we did in that specific class as well as how they felt about the assessment itself and the risks they had to take to answer open-ended questions. The first answer about their comfort made me laugh right out loud.

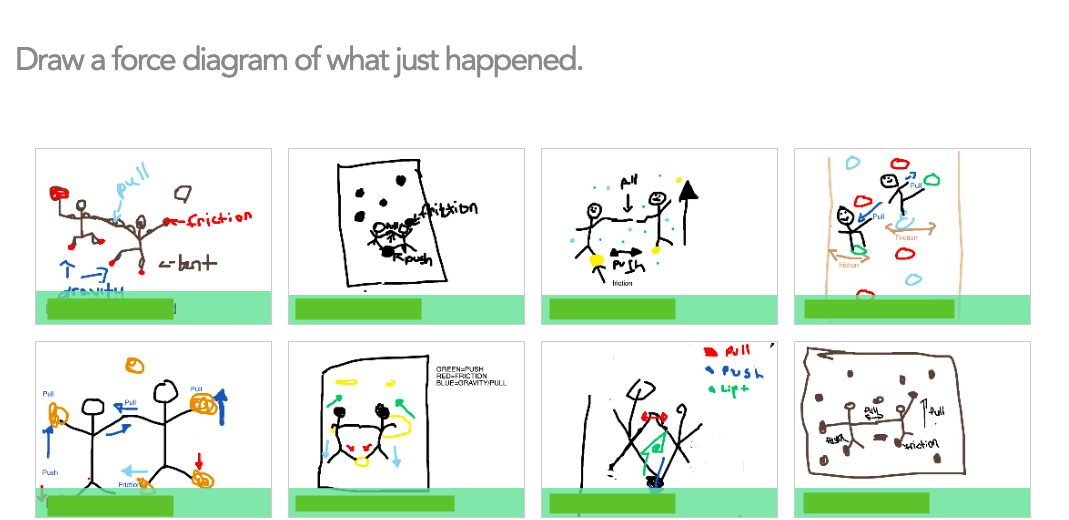
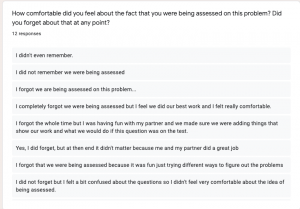
Most forgot they were even being assessed at all.
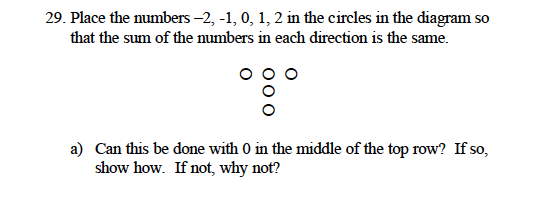
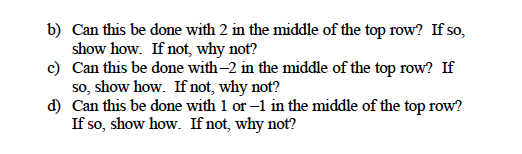
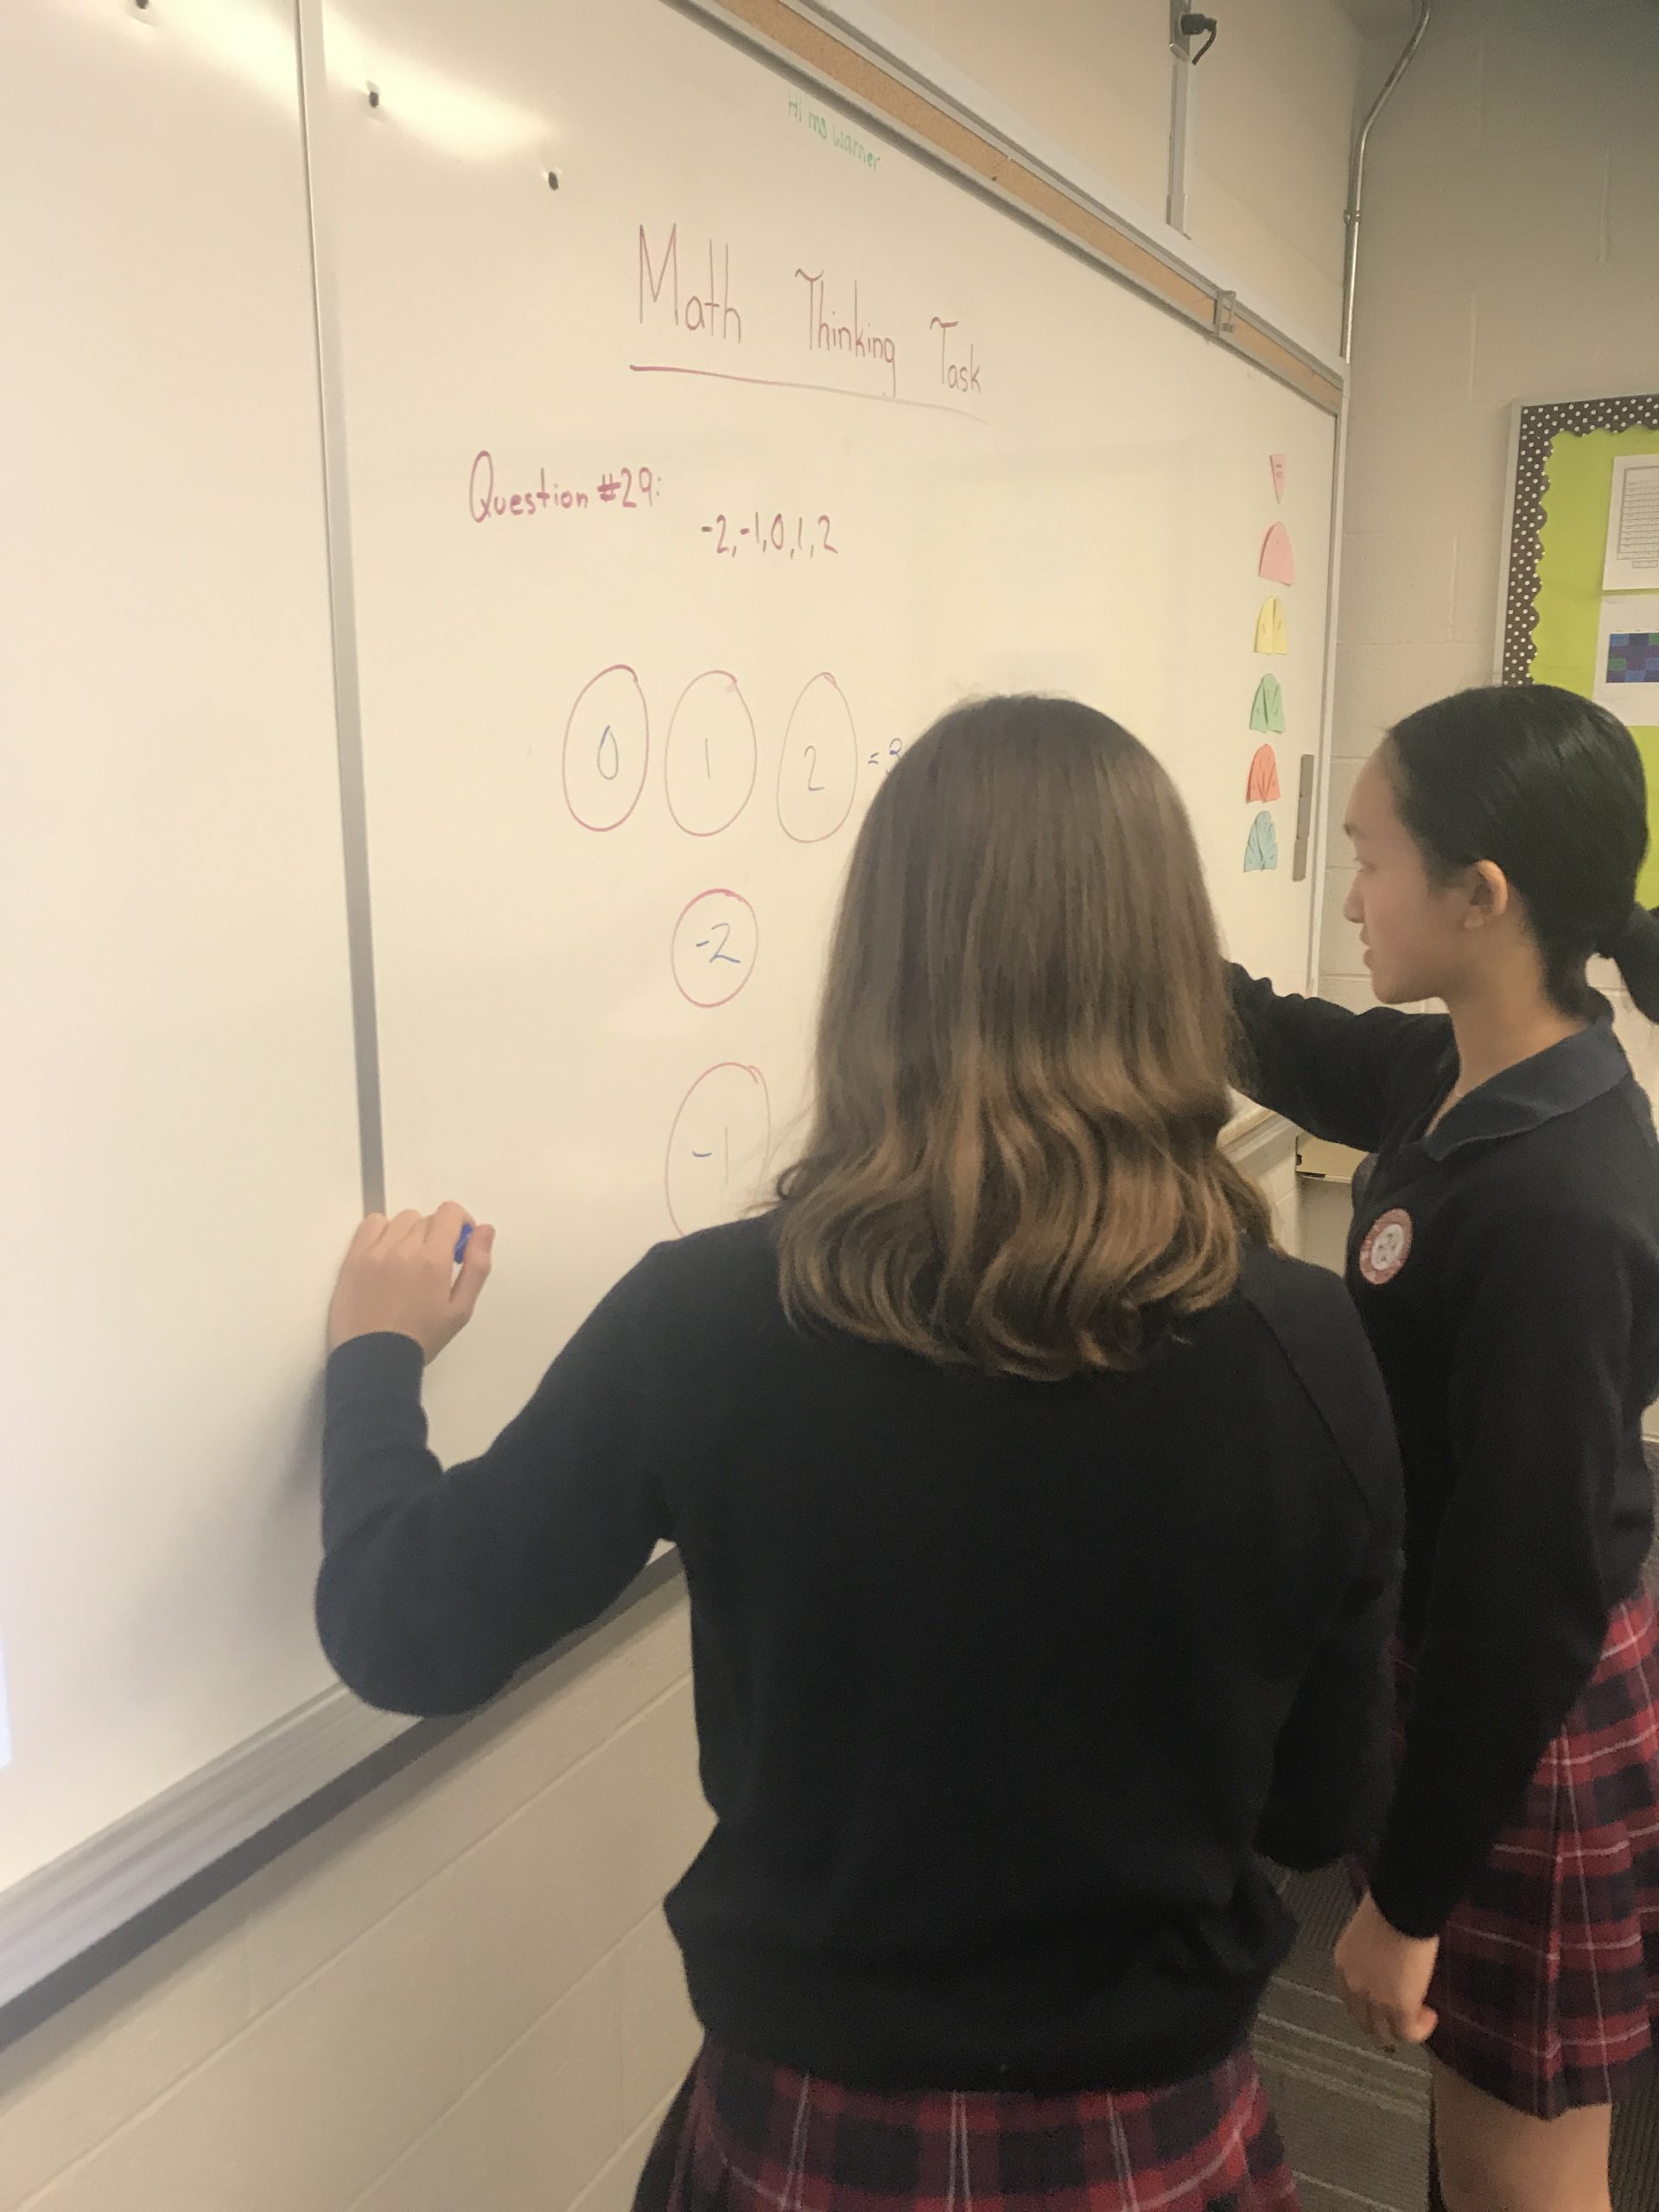
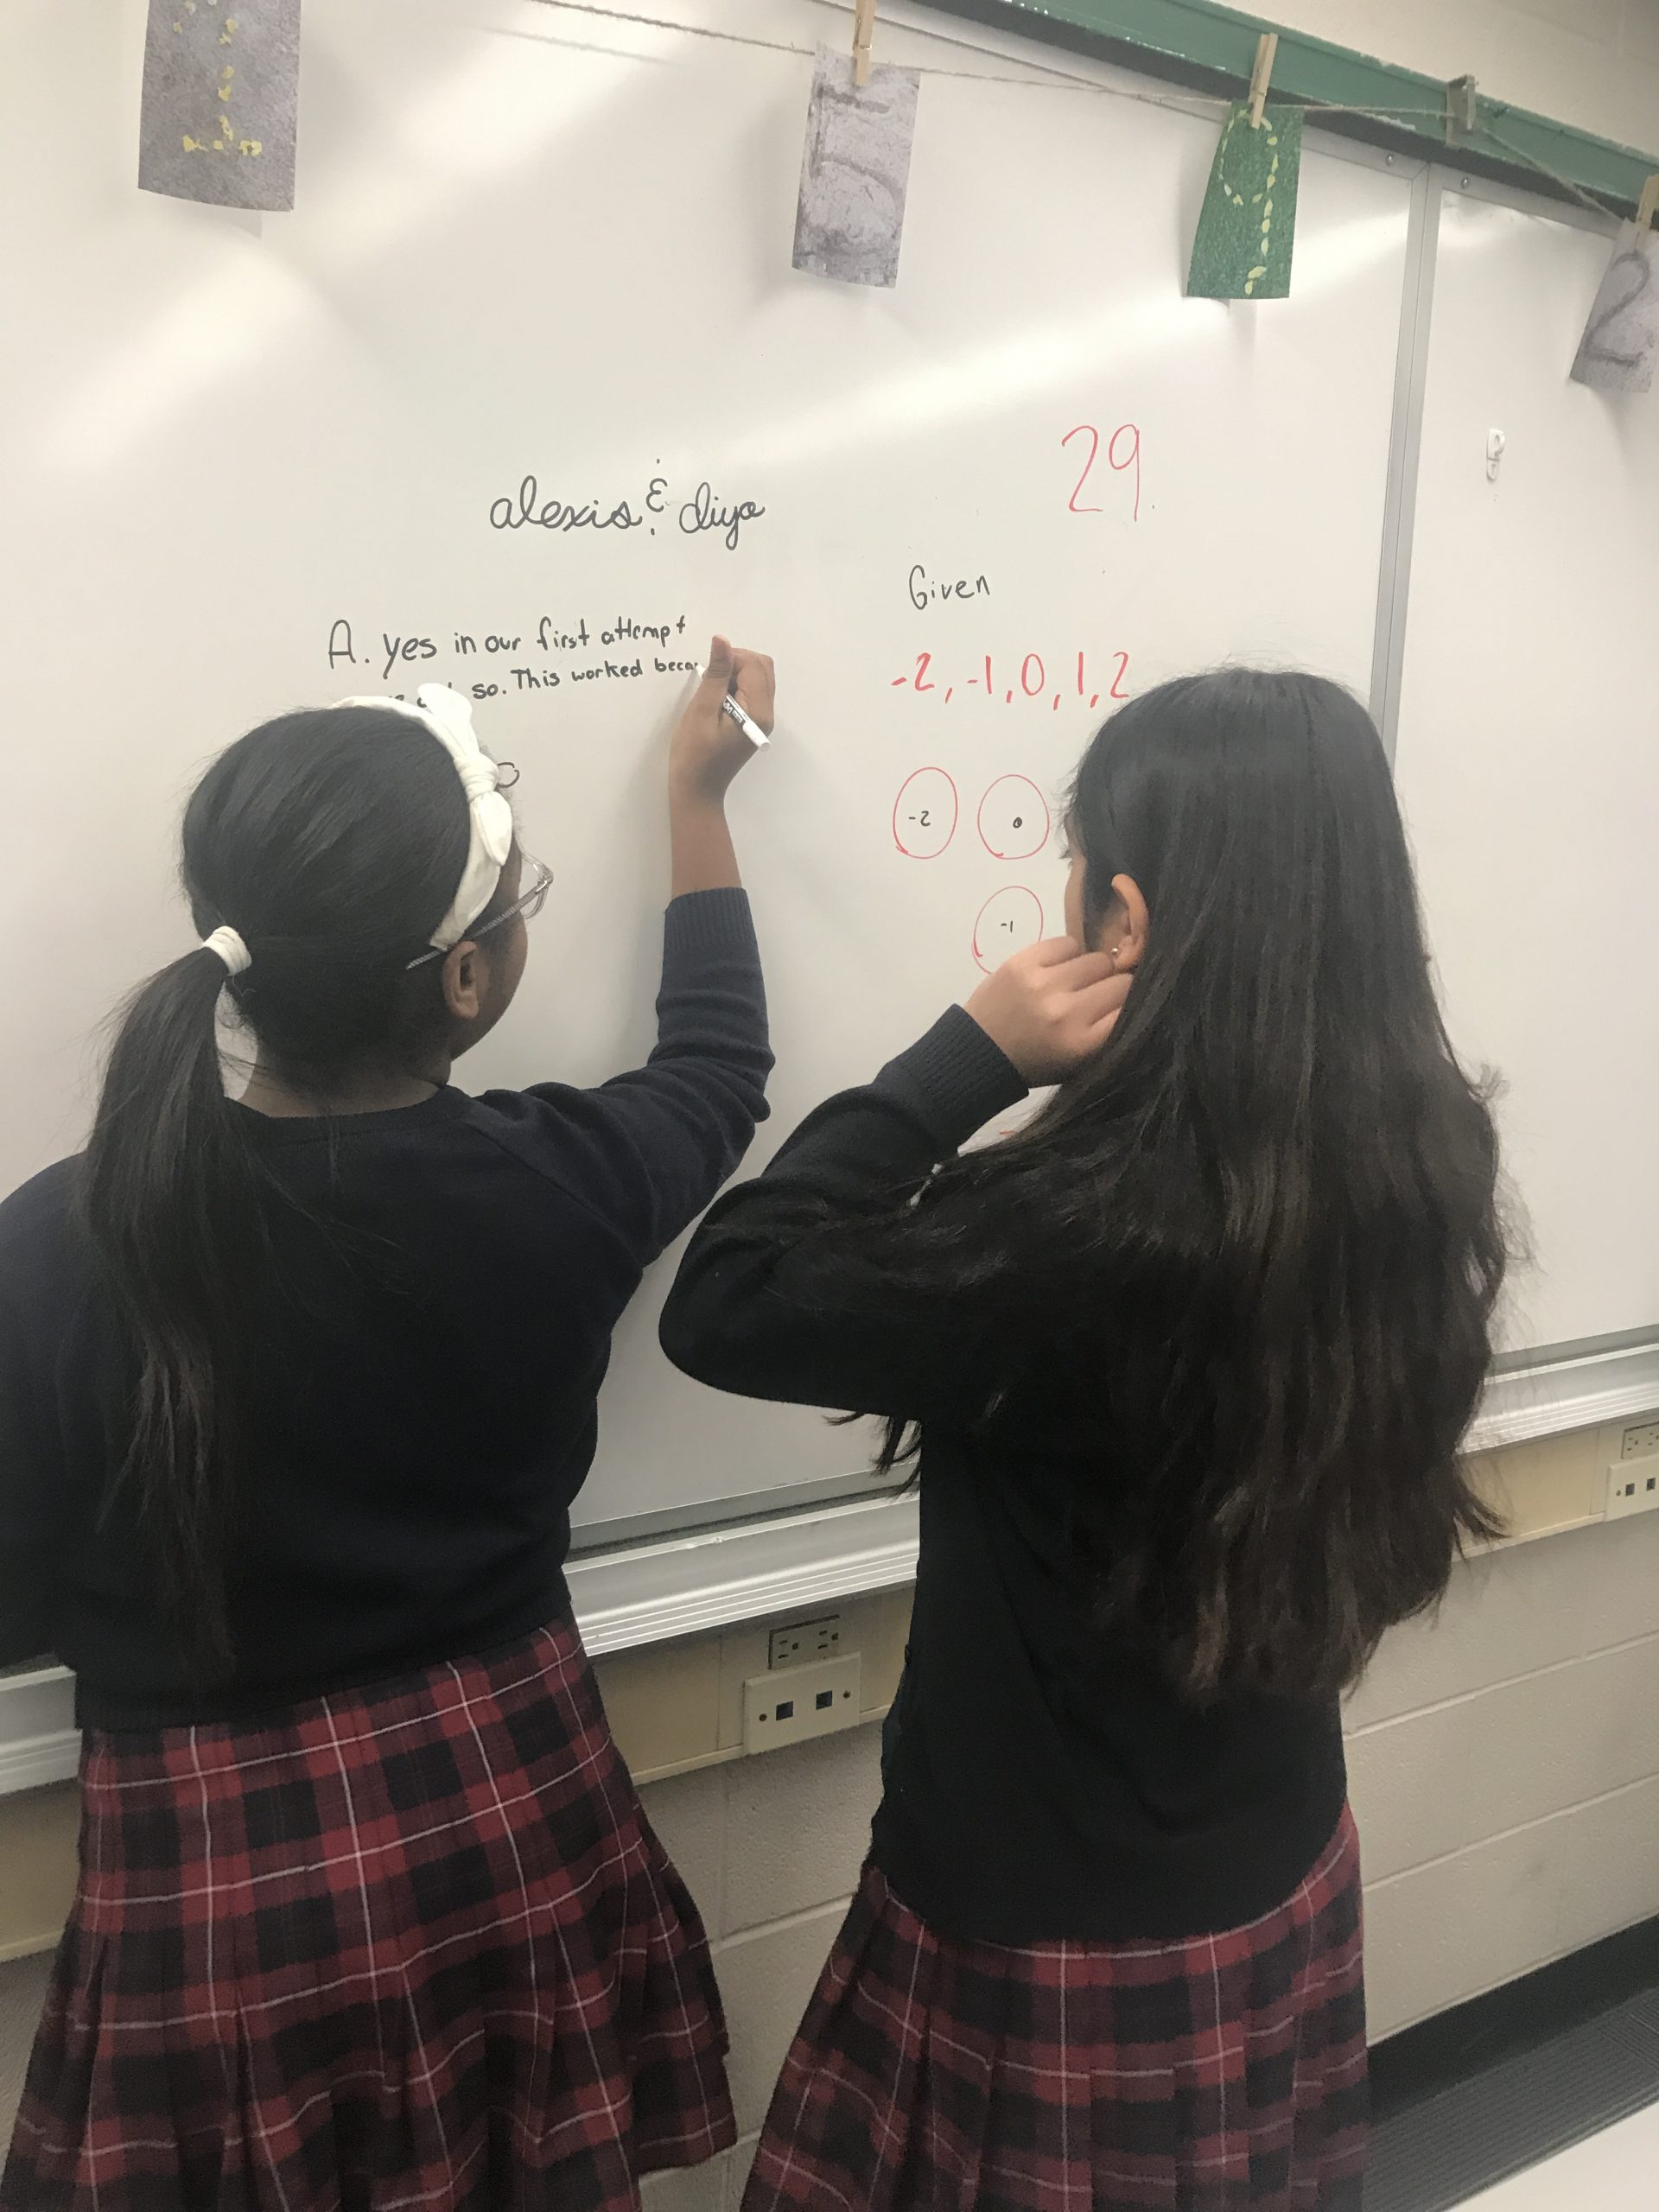
From there I asked them if they felt more comfortable with the risks they took to find answers during this assessment and the answers got me so excited..


I couldn’t have asked for better progress and I was thrilled to see this and their reflection.

I then asked them to consider the changes we made to the lesson and how they felt about several things; from the rubric to the way we used the room to go through and explore these questions. Overall the students seemed to really appreciate how we

use the rubric, and that they were given the opportunity to discuss and problem solve together in an open and engaging way.

To sum up this week ended with me seeing some real tangible results and progress towards my HMW question, and I was able to see real growth not only in myself as a teacher but also in the mindset of my students and their overall engagement in my math class. I am so excited to take this to another level. I think my next goal should be as mentioned before, to see how I can take this beyond my assessments and to my lessons as a whole. Each day I feel that I am teaching more and more authentically and bringing more to my students. I can’t wait to see where I end up next.

An Update on my Single Point Rubric and Math Conversations

So a lot has been going on my mind since our last F2F on Friday and have really been thinking about how much I am doing towards my research question and if I am doing enough. This thought was going through my head while looking at the piles of marking I had on my desk and how I found I wasn’t having enough time to one on one conference witrh my students about their assignments. You can say that my next move was a slight act of neccesity, mild-panic and desperation but with some forethought I promise! The results made me really happy and I could see that all the work I was doing was making a difference to my students and their mindset about their math abilities. And my coaches will be pleased to hear, on the car ride home all I could think was ‘I can’t wait to blog about this.’

Basically, today in math class I had both a science and math assignment I wanted to hand back my students and conference about. I announced to the students that this time I would not be calling them up once at a time to show them their work and essentially stare at them while they look over their work, waiting silently while my nervous students reflect and decide how they performed.

Instead, I told my students I was going to hand their work and rubric to them and that I wanted them to take the time to look over my feedback and the rubric. I told them I didn’t want to see them until they were confident they could discuss how they thought they did on the assignment and the grade they deserved. Here is what happened.

After about 5 minutes I had students lining up at my desk, what used to be 5 minute conversations turned into 1-2 minute conversations where my students could proudly and assertively say, ‘I am here and worked really hard on this‘, or ‘I could have done better on this so I think I’m here.‘ I felt that this conferencing was much more effective and in less than half the time.

Looking back on it this feels like a ‘well duh’ situation. My students were given time to reflect at their own pace and not looking to me for hints. They approached me with more confidence and were able to give more reasoning as to why they believed they succeded or where they need to improve. I felt less flustered and was able to enjoy the conversation.

Afterwards I polled the class and asked how they were feeling. I have kept them in the loop on my professional development and they know this is one area I want to work on with them. Compared to our first single-point rubric and math discussion my students said they felt much more confident and aware of what they were doing. There were less questions about ‘What was my percentage? Did I get the answer correct?’ and more ‘I could have expanded on this more to show my thinking’.

To add to this contrast, I have had two new students since December and a lot of this was entirely new to them. Their contrast really demonstrated to me the growth I’ve seen in my students. I wanted to create a class where students are more confortable taking risks in math and have bought in to the whole learning process. With my new students they had never been asked to reflect on their math responses before. It was entirely new to them.

One student even pointed out, “At my old school they just cared if you got the right answer”. I then asked her “What if you got the right answer but don’t know why?” she replied with ‘That never mattered’.

Basically this to me feels like I’m on the right track and that I can absolutely go deeper. I think this means considering more ways to increase student risk in math that might be outside of assessment. I think I can work more now on discussion prompts or how to incorporate more PBL and open-ended tasks in my day-to-day teaching. A 5 minute conversation with @SirMrMoore on my new unit sparked multiple ideas. I’m excited to see where it will take me.

Diving into Math and Conversations

Happy New Year to everyone!

I hope you all had a wonderful break full of rest and reflections. As the 3rd F2F is coming up I wanted to post about what I have been doing and the anxiety and enjoyment I have been feeling from my process so far.

My current question is ‘How might we shift teaching in math class to encourage risk-taking and student buy-in?‘ Initially my question had also included differentiation in it but the more I’ve been working on it the more I’ve been feeling like it’s a redundant addition. In order to encourage that student risk-taking and buy-in, differentiation is absolutely necessary. It doesn’t work without it so I felt like putting any focus on it distracts from the overall goal and focus.

To that end I wanted to look more into the risk-taking aspect in math, so before the break I was able to go visit one of our math experts in our school and watch her teach a grade 12 math class. I wanted to see how her students handled difficult problems and what the overall atmosphere of her classroom was and I have to say I was blown away. This teacher has done some very cool research on risk-taking and one of her philosophies is to get the kids moving. She has many boards and windows in the classroom and she has the girls working on problems and moving around. While the girls worked on problems I circled around and asked them about how they feel about taking risks in math, what they do when they get stuck and how comfortable they feel when they’re unsure in math but moving forward.

The girls then reflected that it was much easier to try things when you could look around the classroom and see that everyone was trying. They said that when they were working on paper at their desk it was hard to tell if people were actually trying or just breezing through and it was only them that was struggling. I then asked the girls when they started feeling comfortable with the idea of taking risks and making mistakes and for the most part the girls agreed that it was a slow transition that came with time and more practice. This is something I think I want to dig deeper into, to see if there was a pivotal time or transition for them in their math journey. I find with my age group they can get paralyzed with math, thinking that either their parents will get mad at them or that they’re dumb because they don’t understand. I want to look more into how I can encourage those mistakes and make them feel less big. Things feeling big is a huge part of being 12-13.


Another thing I have been doing is introducing the concept of what a good math response looks like and drawing focus away on simply getting the right answer. With my classes we collaboratively made a single point rubric on what a strong math response looks like. The goal of this exercise was to emphasize that in terms of the big picture, the correct answer is only a small part of the math they are working on. This was actually something that happened naturally through conversation. We followed the steps highlighted in my last post and I had the girls define ‘what makes a strong math answer’ and this was their result

Knowledge and Understanding

  • Answer is checked to ensure it makes sense
  • Answer is underlined
  • Understands and uses formula
  • No errors in calculations

Application

  • Thoughts are organized using the GRASP method
  • Answer is broken down into appropriate GRASP parts to show thinking
  • Answer shows understanding of the concepts presented
  • Answer clearly shows student thinking

Thinking

  • A detailed sketch or diagram about the question is made
  • Student chose an appropriate strategy to solve

Communication

  • Math is written clearly and all work is shown for every step
  • Answer includes a proper conclusion sentence
  • Answer includes a detailed explanation of thinking
  • Writing is organized and steps are easy to follow

This was the list my students generated, and when we finished and organized it I turned to the girls and asked ‘how much of this is about having the right answer?’ This prompted some really great discussion. Through this activity we got to really bring home the idea that I am not focusing on the mistakes they make but more interested in the process. I want them to take risks and I want to see how they break down a problem and think critically about a solution. We are starting another thinking task this week in which we will come back to this rubric and I’m really excited to see how they approach the next ‘stumper’ and to see them document their process.

Asking Questions About My Math Lessons

After coming through from our first face to face and discussing my goals with my mentors, I came out with a much clearer picture of what I wanted to work on this year. After sitting down with Tina @mstinajagdeo, Lisa @lmitchell and Marc @marcbrims and discussing my thoughts I realized that my biggest area that I wanted to work on was expanding my math abilities. In science I feel confident in my use of PBL and my ‘toolbox’ of different strategies and options that my students have. Through it I felt I was able to create a strong level of differentiation and personalization but this was something I felt I was lacking in math and wanted to expand on. it’s also something our school has decided to put much more focus on this year. I was unsure about my lessons as a lot of them involved Power Points and notes and not as much hands on activities as my science lessons. That being said I needed to be sure this was what fit with what my students might need and how they learnt best. To find this out I designed a survey that I would send out to my students from last year, as they had already been through a year with me and had more material to go off of than my current students. I have to give credit to Tina here as this was her brilliant idea! So I went on to developing my survey.

The hardest part of the next stage was making sure my ego was not coming into play. When asking my students I had to make sure my questions didn’t go the direction I wanted it to go, but instead were neutral questions that promoted reflection on how they learnt. Looking back I can think of my favourite math unit and why I think my students might have thought the same way, but just because I enjoyed it and felt it went deeper doesn’t mean all of my students might have. The whole point was to learn from my students and not just puff up my ego as a teacher and pat myself on the back.

To that end I made a list of students to send my survey to and made sure they were from a wide variety. On my list were my high flyers and math lovers as well as students that struggled and perceived themselves as bad at math when they first entered my classroom. I also included students who were new last year as well as students who had been at my school since pre-K. I wanted to make sure all of my bases were covered and I could get the most variety and opinion.

The overall goal was to determine what style of lessons my students preferred and what they felt they needed more of to succeed in class. I also wanted to know if there were other strategies they might need that I wasn’t suppling. I work very hard on metacognition with my students as they are at an age where it really starts to be something they can do. So asking them to constantly reflect is a process I spend a lot of time on and I felt I could use for my research. I had them reflect on strategies they felt helped them learn as well as other ways they might like to be assessed.

The results were not what I expected (which I’m sure my mentors expected). The area I thought my students would gravitate to more was a unit my teaching partner and I developed last year about Pythagoras. In that unit the students discovered the formula on their own through a series of tasks they were given. Instead of simply being given the formula they found and made it themselves. I loved this unit, it was hands on and because the students discovered it themselves I found they remembered and understood it much more than they would have otherwise. What I found was that my lower ability and gifted students mentioned this unit as being their favourite in the year for those very reasons.

My high flyers however mentioned Algebra as being their favourite. The reasons they gave were answers like this

“I think my favourite lessons were the ones that had real world problems and ones that let us use our creativity.”


This reflection shouldn’t have surprised me, it’s always fun and gratifying when you can use your skills creatively, especially to solve problems. It’s something I really have pushed in science but clearly not enough in math. I’m not surprised my high flyers felt this way and I think I will absolutely need to create more opportunity for it.
The other aspect of my survey that surprised me was this response
I had expected that more students would have chosen options like solving puzzles or hands-on activities, but the majority of students picked discussing the concepts in class and watching the teacher go through questions.  Though I’m all for discussion watching me go through problems caught me a little off guard. This makes me wonder about their overall confidence in discovering things on their own and making mistakes. Watching me go through problems is very low risk for them and can have a tendency to not make much of an impact compared to actively solving things themselves. This in itself is something I want to reflect on more.
The last thing I noticed that I was happy to see was that the next biggest option was to work through homework in class. I always tell the students practice doesn’t make perfect it makes permanent. I prefer to give them a space where they can practice skills correctly before going off alone and developing bad habits.
After that question I had asked students to explain their choices and this was a sample of the answers I got.
“These methods worked best for me because they made my busy schedule more flexible and homework became a lot less stressful!”
“I chose the choices because it was easier for me as an individual to work this way. Other people probably have a different because each student learns the best in their own ways.”
“I think watching Miss Garand walk us through the steps really helped as I could correct my mistakes thoroughly and see where I made the mistakes. I think this is different from the other strategies because we are actually getting the right answer and strategies to solve it next time.”
“Having the teacher explain any concepts that might seem difficult and going through questions that I get wrong so i understand where my mistake was”
“For me it helped a lot to go through the homework and be able to ask questions. I got to practise, which really helped, but I still learned what I hadn’t yet figured out.”


“I like having somebody explain it to me (a person, not a video) so that I can ask questions. I also found it beneficial to learn with the class so that if I don’t understand the way the teacher is explaining, a classmate could jump in and explain it in a different way.””

“Trial and error – you can discuss with peers why something may or may not work! Working with people is fun”

“I liked using the triangle with three squares on the outside of it in the first pythag lesson to understand the theorem if that makes sense? Kinda like visual learning? also discussing concepts as a class made it seem more open of a discussion”

After looking at these answers I feel there is a lot for me to unpack and reflect on, but my biggest takeaway is how different all my students are, and I wonder if I am presenting enough different ways for them to learn outside of the safe ‘watching the teacher’ strategy. It seems that my class has a good culture in terms of discussion and presenting ideas but I would like to create more opportunity for them to take more risk and solve more real world problems.

Allowing them to use their creativity more I think would create an even more fun and engaging classroom. To that end I’m excited to expand my toolbox and try and find more strategies that fit with my students needs. I’m also interested in hearing thoughts from the Cedar group and my mentor’s on my student’s thoughts and my reflections. Looking forward to asking the room!